Round We Go

Stampin Up Round We Go

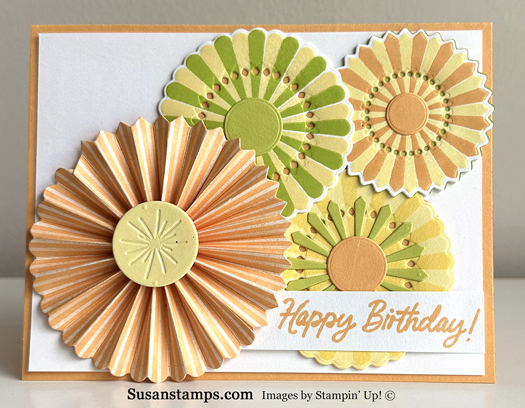
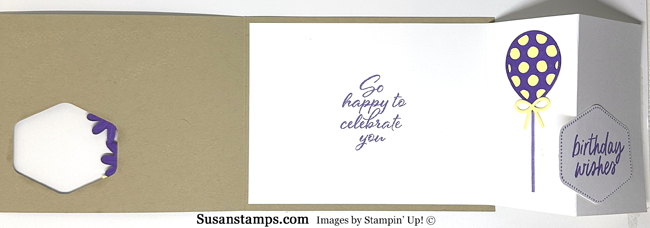
Round We Go is a fun new bundle that Stampin’ Up!®  has in the 2025-2025 Annual Catalog.  The bundle includes a stamp set and some dies.  I like it because it is something different and has lots of birthday sentiments included with it.

The colors I used for this card are Peach Pie, Lemon Lolly and Lemon Lime Twist.  The first thing I did was make the rosette.  I used the new 2024-2026 InColor Designer Series Paper for this.  You have to use the die twice to make one rosette and then you glue each end together.  Now if you look closely, you will see how I messed it up but decided to use it anyway.  Here is a close up of what NOT to do:

Stampin Up Round We Go

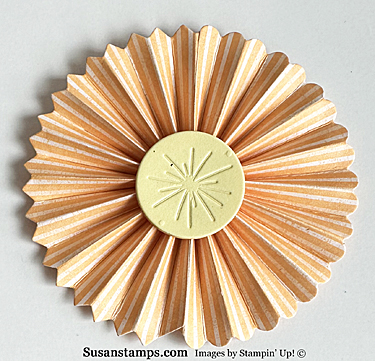
As you can see in the photo one side has pointed ends and one side and rounded ends.  Oops. I didn’t notice it until I had already made it.  I figured no one would look too closely to notice and if they did, hopefully they will laugh.

After making the rosette, I stamped and cut out the rest of the circles and all the parts that go with them.  It was kind of fun to mix and match all the colors.  I stamped the sentiment in Peach Pie.
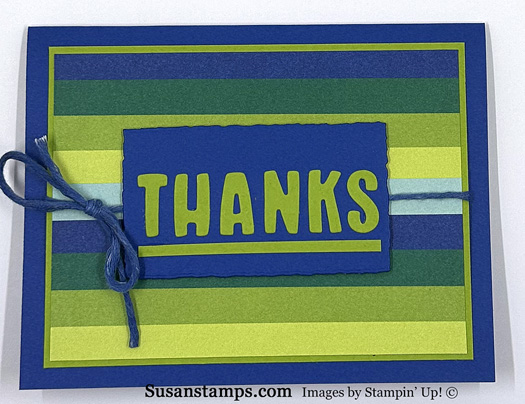
Product List


Leaf Collection Color Techniques

As most of you know, Buffy Cooper is my best Stampin’  buddy.  We have been friends for as long as I have been a Stampin’ Up!®  demonstrator (which is 16 years).  Buffy is very talented and has so many great ideas and techniques she uses with her cards.  These cards show a couple of techniques I learned from her.

This card technique is called Joseph’s Coat.  It is pretty simple to do but adds a real pop of color.

Stampin Up Leaf Collection, Joseph's Coat

To make the card above, I first add some color to a piece of Basic White card stock using Blending Brushes.  The colors I chose were Daffodil Delight, Granny Apple Green and a new InColor called Peach Pie.  I randomly added this ink until the entire piece of white cardstock was covered in color.

Next, I used the background stamp called Leaf Collection which is a new stamp in the Annual Catalog.  I inked it with Versamark Ink and them heat embossed it using clear embossing powder.  Next, I took a Memento Black ink pad and wiped black ink over the top.  The ink just sticks to the card stock that did not have an embossed image on it.  When you are done, then you just wipe off the black ink from the embossed leaves.

The sentiment I used was from the stamp set called Simply Said.  I cut it out using two dies from a new die set called Unbound Love.  I love how the two dies fit together.  I added some Daffodil Delight Ribbon (retired) and adhered it to a piece of Daffodil Delight card stock and a Granny Apple Green card base.

This next card, I did the opposite of the first card.  I stamped the leaves in Versamark Ink and embossed them with clear embossing powder on a piece of Basic White card stock.  Then I added Bubble Bath, Petunia Pop and Berry Burst ink using Blending Brushes over the top.  Doing it this way, left the leaves white.  I am sure there is a name for this but I don’t know what it is.

The sentiment is from the stamp set called Unbound Love which I cut out using the coordinating die set.  I added a piece of 1/4″ Diagonal Trim Combo Pack ribbon in white.

Which technique do you like best?

Product List

Around The Bend Fun Fold

Stampin Up Around The Bend

You know I always love a fun fold card and the other day I saw one by Cindy Lee Bee Designs that I thought was very cute and clever so I decided to try it for myself.  This card is a fun fold because when you open it, the punched out sentiment is attached to the inside of the card.

Stampin Up Around The Bend, Stampin Up Heartfelt Hexagon

I used a 11″ x 4.25″ piece of Crumb Cake card stock and folded it in half for the outside of the card.  The inside is a 9.5″ x 4″ piece of Basic White card stock that is scored at 5.25″ and 7 3/8″.  I adhered the white piece inside of the card base in order to get the positioning of the punched sentiment.

For the outside of the card, I first cut a 2″ x 5.5″ piece of Perennial Lavender Designer Series Paper on a Crumb Cake card base.  Then I added 2 1/4″ strip of Highland Heather card stock to each side of the DSP.  I estimated where the punched out sentiment will attach to the inside piece and used the Heartfelt Hexagon to punch out the hole on the card front.  I stamped the outline from the Heartfelt Hexagon stamp set and the sentiment in Highland Heather ink from the Simply Said stamp set (which is a new set coming out on May 1st) and punched it out using the Heartfelt Hexagon punch.  I added adhesive to the right side of the punched piece, closed the card and centered it in punched hole.  This way it adhered to the inside piece but lined up perfectly with the outside.

After this, I die cut all the flowers and leaves from the Around The Bend die set in Gorgeous Grape, Highland Heather, Lemon Lolly and Shy Shamrock card stock and adhered them around the punched hole being careful not to get any adhesive on the punched piece.  I used a retired die set called Balloon Pop Up Dies for the balloon on the inside of the card.  The inside sentiment is from the stamp set called Layering Leaves.

The links below include everything but the new Simply Said stamp set because it is not available until May 1st.

Product List


Seaside Wishes Sneak Peek

Stampin Up Seaside Wishes

As I am sure you know, the new 2024-2025 Annual Stampin’ Up!®  catalog will be live on May 1st.  I am also sure you have heard that the new catalog has a bit different set up than previous catalogs.  It takes a while to get used to the new format.  In spite of this, it is filled with amazing products.  As a demonstrator I was able to purchase a limited selection of products from it.

One of them was a bundle called Seaside Wishes.  I knew I had to purchase this set because of the sand dollars that are included in it.  Here is why:

Every year Rob and I are able to go to the Florida west coast and every year I come home with lots and lots of sand dollars.  I love them and it is fun to collect them. Rob thinks I have more than I need but you always need more shells and more sand dollars, don’t you think?

The Seaside Wishes Bundle is in the new catalog.  It includes a stamp set, a hybrid embossing folder and dies.  A hybrid embossing folder can work like a normal embossing folder but it also comes with a large die where you can ink, emboss and cut at the same time.  To do this, I added some a new color called Basic Beige ink by tapping the ink pad directly onto the embossing folder.  You can also use a brayer if you have one.  Then you lay the die down on the folder.  It fits perfectly around the sand dollars.  Then you lay the card stock (I used Basic Beige) on top and run it through your Cut & Emboss machine.  As you can see by the photo, the sand dollars have ink on them, are embossed and cut into separate pieces.  So much fun!

I also used a new Designer Series Paper pack called Country Woods.  It is a great pattern for background.  I layered it onto a piece of Basic Gray card. stock and a Basic White card base.  I stamped the sentiment in Basic Gray ink.  Lastly, I added some Pebbles Enamel Shapes (retired).

I have a long list of products I will be ordering from this catalog and am looking forward to May 1st!  I am sorry I can not post links to the new products because they aren’ available yet.


Quick & Easy Simply Zinnia Cards

Sometimes you need a card and you don’t have anything appropriate for the occasion already made.  Designer Series Paper to the rescue.  Stampin’ Up!’s DSP is so beautiful that it is easy to make a card using it.  Then all you need to do is add a stamped sentiment and you are all done.  Below are three examples of quick and easy cards made with DSP.

To make this first card I used a 4″ x 5.25″ piece of Flowering Zinnias Designer Series Paper with a Highland Heather card base.  I stamped the sentiment from the stamp set called Simply Zinnia with Highland Heather ink and then colored a piece of white Baker’s Twine using the dark Highland Heather Blends and tied it around the DSP before adhering it to the card base.

Stampin Up Simply Zinnia

This second card uses the same piece of Designer Series Paper with an Old Olive card base.  I wrapped a piece of Old Olive ribbon (retired) around the bottom and adhered a sentiment from a new product that will be in the 2024-2025 Annual Catalog called Saying Something Ephemera Pack.  This pack of sentiments is all stamped and ready for you to adhere to your project.  You are going to love these!  You will be able to purchase them on May 1st.

This last card, again, uses the same Designer Series Paper with a Blackberry Bliss background.  I stamped the sentiment from Simply Zinnia with Versamark ink and then heat embossed it using white embossing powder.  I cut the tail using the retired Banners Pick A Punch.

The Flowers Zinnia Designer Series Paper and the Simply Zinnia stamp set and coordinating dies are part of the Online Exclusive product line.  They are not in any catalog but are available to purchase online.  You can click HERE to see these Online Exclusive Products as well as all the others that are available.

Product List


Painted Lavender

Stampin Up Painted Lavender

Yesterday was the first day of the new Stampin’ Up!®  2024 January – April Catalog and the first day of Sale-a-bration.  In case you don’t know what Sale-a-bration (or SAB) means, it is where you can earn Stampin’ Up!®  products for free with qualifying orders.  For every $50 you spend, you can earn one free item.  If you order $100 worth of products you can earn up to two free items.  Some of the products you can earn have to have a $50 order and some a $100 order.  There is no limit to how many free products you can get.  It is also a great time to join Stampin’ Up!®  as a demonstrator.  For $99 you can get $125 worth of free products from the Annual Or Mini Catalogs plus a free Glass Mat, Silicone Mat and Cleaning Cloth OR you can get $155 worth of free products!

The new Mini Catalog has some amazing products in it.  Some of the products I ordered first was the Perennial Lavender Suite.  This enormous suite includes the stamp set and coordinating dies called Painted Lavender, Paper Butterfly Accents, the Perennial Postage stamp set and dies, Purple Fine Shimmer Gems and the Perennial Lavender Designer Series Paper.

To make this card I first layered a 4″ x 5.25″ piece of the Perennial Lavender Designer Series Paper onto a Pretty Peacock card base.  Then I used the Countryside Corners dies with Crumb Cake card stock for the center.  I stamped the flowers in Highland Heather and Gorgeous Grape ink (the flowers are a 2-step stamp set where it takes 2 or more stamps to make one image).  I stamped the stems in Pretty Peacock ink and cut the flowers and stems out using the coordinating dies.

The sentiment I used is from the stamp set called Timeless Arrangements.  I stamped it in Versamark ink and then heat embossed it using White Embossing Powder.  I layered it on the card using Dimensionals.  Lastly, I added some Purple  Fine Shimmer Gems.

Product List

Mini Alphabet Die

Stampin Up Mini Alphabet Die

Happy New Year to everyone.  I am wishing you and your families health and happiness in this new year.

I have said this before and it is still true.  One of the things I love about being a Stampin’ Up!®  Demonstrator is I get to order new products early.  I’m not a patient person and when I see something I love, I want to get it.  I get to see all the catalogs that come out before non-demos and I am able to order some of them too.  The 2024 January – April Mini Catalog is coming out beginning January 5th but I was able to order some of the products early.  Sale-a-bration is also starting in January and, again, I could order early.

One of the things I wanted was the new Mini Alphabet Die set.  This is different than previous letter dies sets I have owned because one die cuts out all the letters at once.  Plus, it has some double letters which means you can still cut out all the needed letters all at once.  There are two other dies in the set that cut out punctuation and diacritics.  This is a photo of the big die.

To make this card, I first layered a 4.75″ x 3.5″ piece of Merry Bold & Bright Designer Series Paper on a 4 7/8″ x 3 5/8″ piece of Granny Apple Green card stock.  This DSP has Christmas themed paper on one side and non-christmas themed paper on the other so you can use it year round.  Then I used a piece of white Baker’s Twine and colored it with a Blueberry Bushel Blends and tied it around the card stock.  Then I layered it onto a Blueberry Bushel card base.

Next, I cut out a piece of Blueberry Bushel card stock using a Deckled Rectangle die.  I cut out the letters using the Mini Alphabet Die in Granny Apple Green card stock and adhered them using Multipurpose Glue. I decided it needed something more so I cut a 1/8″ strip of Granny Apple Green card stock and I adhered it under the word.  Lastly, added it the card using Dimensionals.

I can not share the item number for the Mini Alphabet Dies because it is not available until January 4th when the catalog goes live.


Product List


Everyday Details Dies Sneak Peek

Stampin Up Everyday Details

I hope everyone had a wonderful Christmas.  Rob and I had a wonderful day spending time with our family.  It was fun, crazy, and exhausting but I loved every second of it.  I love seeing my grandchildren’s excitement when they wake up Christmas morning and see all the gifts under the tree.

This card shows you another sneak peek from the upcoming 2024  Stampin’ Up!®  January – April Mini Catalog that starts on January 5th.  It is a new bundle called Everyday Details which includes a stamp set and a coordinating die set.  I used the dies for my card.   There are eleven dies included in this bundle that cut out the dots outlining the center rectangle on my card.  There are also more rectangles and circles and as well as a couple of strips.

To make this card, I first used a 4″ x 5.25″ piece of  Winter Meadow Designer Series Paper and cut out the center using one of the Everyday Details dies.  This particular die cuts out the rectangle with the dots as well as around the rectangle.  After cutting it out, I adhered it to a Basic White card base.

Next, I used the stamp set called Sending Smiles along with the coordinating dies called Sending.  I stamped the flowers in Pumpkin Pie and Daffodil Delight ink and the leaves in Lemon Lime Twist.  I cut them out and layered them on top of the DSP.  I stamped the sentiment in Misty Moonlight ink and adhered it using Mini Dimensionals.  Lastly, I added Noble Peacock Rhinestones (retired) to my card.

I can not post links to the new products that will be available on January 5th but I can include the products that are available.

Product List

Softly Sophisticated Sale-a-bration

Stampin Up Softly Sophisticated, Stampin Up Flight & Airy

Here is another sneak peek card I made using some new products in the 2024 Sale-a-bration Catalog.  This catalog begins on January 5th.  You can earn all the products in the SAB catalog for free with a qualifying order.  The best part of Sale-a-bration is there is no limit to the amount of products you can earn.  Some of the products in the catalog are free with a $50 order and others are with a $100 order.

To make this card I first using a new bundle called Softly Sophisticated.  This bundle includes a stamp set and embossing folder.  You can get this bundle with a $100 order.  I used a 4″ x 5.25″ piece of Misty Moonlight card stock with the Softly Sophisticated Embossing Folder.  I layered this piece onto a Basic White card base.  Next, I stamped the sentiment in Misty Moonlight ink onto a circle I had cut out using the Stylish Shapes Dies that are in the 2023/2024 Stampin Up! Annual Catalog and adhered that to the card.

There are also a few packages of Designer Series Paper in the SAB catalog that you can also get for free with a $50 order.  One of them is called Flight & Airy.  It is really cute paper with birds and flowers on one side and solid colors on the other.   I cut out the bird sitting on the branch of flowers from this paper.  I layered this using Dimensionals.  Lastly, I added someTinsel Gems.

As a reminder, I can not post links to the new products I used until the catalog goes live on January 5th but I did add the ones that are current now.

Product List