Simply Zinnia

Stampin Up Simply Zinnia

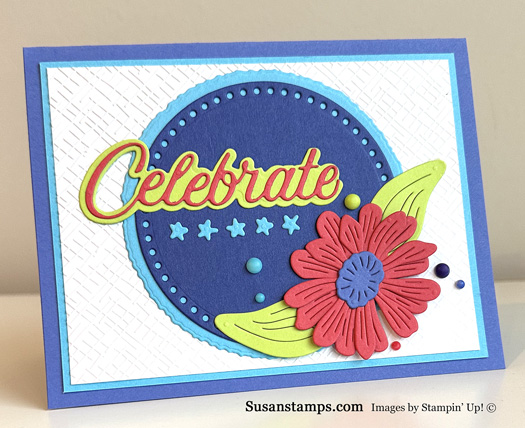
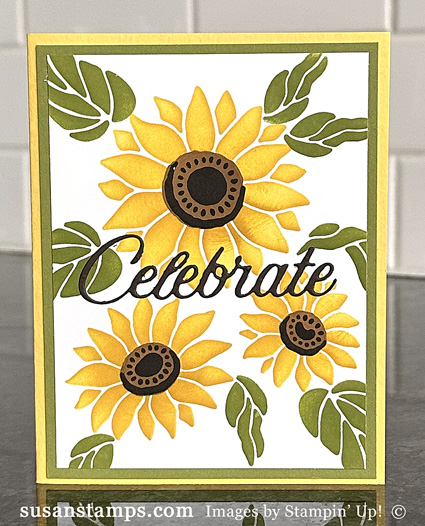
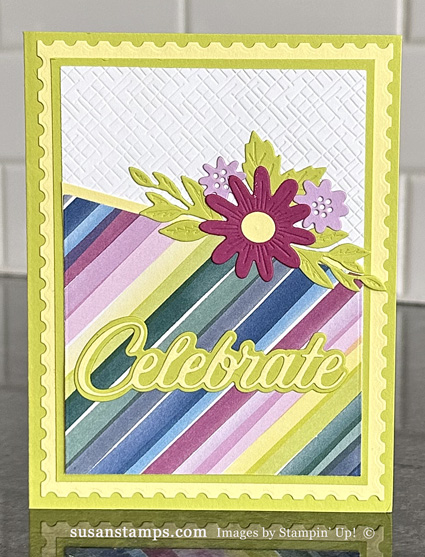
It is that time of year when we have to say goodbye to a set of InColors.  This time Sweet Sorbet, Orchis Oasis, Starry Sky, Tahitian Tide and Parakeet Party are retiring.  These colors were one of my favorite sets because they are bright and cheerful.  I hate to see them go, but it is how the Stampin’ Up!®  world works.  I decided to make a card using all the retiring colors.  It is a little overwhelming but I am ok with it.

To make this card, I first cut out all the pieces.  I just realized as I am writing this that I used all dies and no stamps on this card.  I used a few Online Exclusive products.  I first cut out the flower and leaves from the die set called Simply Zinnia in Sweet Sorbet, Parakeet Party and Orchid Oasis card stock and the little flowers using Tahitian Tide.  Then I used the die set called Wanted to Say for the sentiment and the sentiment background.  I cut out the larger circle in Tahitian Tide card stock using the Decked Circles die set.  I layered another circle using the Everyday Details die set in Starry Sky.  I layered a piece of Basic White card stock that I had embossed using one of the Basics 3D embossing folders and layered that on a piece of Tahitian Tide card stock and an Orchid Oasis card base.  Lastly, I added some 2022-2024 InColor Matte Decorative Dots.

If you like this colors make sure you stock up before they are no longer available.  Once Stampin’ Up!®  runs out of anything that is retiring, it will be gone for good.


Product List

Wanted To Say

Stampin Up Wanted To Say

There are only a couple more days left to order Stampin’ Up!®  products from the 2023 September – December Mini Catalog.  There are some really great products in this catalog (one of my favorites being the Winter Meadow Bundle).  Most of the products in this catalog are being retired so if you like anything, you should purchase them before it is too late.

One of my favorite Designer Series Papers is called Winter Meadow.  The bundle this belongs too, including the stamp set and dies are retiring, but the DSP is being carried over.  I am not sure if it will be in the 2024 Annual Catalog or be an Online Exclusive but one way or another it will still be available.  I used this paper for the background of my card.

To make this card I first folded a 5.5″ x 8.25″ piece of Basic White card stock in half.  Then I took the scalloped die from the set called Around the Bend and cut off part of the front of the card.  I used the same die on a piece of the Winter Meadow DSP and layered that on top.  I cut another 4.25″ x 5.5″ piece and layered that on the inside of the card so you could see it from the front.

Next, I took the set of dies called Wanted To Say.  I love these dies because they cut out the different phrases ( Happy Birthday, Celebrate, Feel Better Soon, and you’re too kind) as well as a background for each of these phrases.  Plus it has extra dies such as stars, flowers, hearts and others.  I cut the words out in Boho Blue and the backgrounds in Misty Moonlight.  Lastly, I added some 2023-2025 InColor Dots.

One of the things I love about this Designer Series Paper is you the patterns are so beautiful that you don’t need to do any stamping.  It’s great if you need a quick and easy card.

<!——– TAMS End ———- Product List

Paper Florist Dies

Stampin Up Paper Florist Dies

I had a very long and crazy past few days but hopefully things will die down a bit.  We spent a couple of days last week packing up the cottage and loading the truck to head back to Nashville.  The one big problem with that is I have to pack up all my stamping products and supplies so I haven’t been able to make anything.  Then we spent 16 hours driving from Northern New York to Nashville all in one day.  I know.  It was crazy and we were exhausted but it is nice to be here again.  I am not sure which is better, though ~ to drive it all in one day, unpack the truck and spend the next day exhausted putting things away or taking two days to drive and unpacking that day after.

In any case, I was able to make this one card before having to pack every thing up.  The card is made with all dies and no stamping!  I just love all word dies.  They make things so easy.

To make this card I first cut out a piece of Basic White card stock using the largest die from the Radiating Stitches die set.  I layered that onto a Granny Apple Green card base.  Then I used a smaller Radiating Stitches die to cut out the middle panel in Basic White card stock and layered that onto a 2 7/8 x 4 1/8 piece of Granny Apple Green card stock.  Next, I cut all the parts for the flowers and leaves using the Paper Florist Dies in Daffodil Delight, Flirty Flamingo, and Coastal Cabana card stock and the leaves and stems ( I used Cheerful Daisies for the stems) in Granny Apple Green.

Lastly, I cut out the sentiment using the Wanted To Say die set three times and layered them together using glue before adhering them the card.  I like layering the sentiments because it makes it stand out more.

Product List


Inked & Tiled

Stampin Up Inked & Tiled

I know I have not been very good about posting things lately.  It is harder to do when we are at the cottage.  I have to choose between stamping inside or being outdoors in or on the lake.  Luckily it was kind of rainy the other day so I I was able to make a couple of cards.

I used the stamp set called Inked & Tiled to make this card.  It is part of a suite called Inked Botanicals.  There are also two punches, Inked Botanicals 6″ x 6″ Designer Series Paper, and Lost Lagoon 1/4″ Bordered Ribbon included in this suite.

This card was super easy to make.  I used my Calypso Coral and Lost Lagoon Stampin’ Write Markers to color the flower and leaf stamp.  I love using markers when you can to use two or more colors on one stamp.  You just color one portion and then the next using whatever colors you want.  Then you “huff” warm breath on it to add moisture to the ink in case it dried a bit before stamping.  I did this multiple times onto a 3 5/8″ x 5.5″ piece of Very Vanilla card stock.  Then I layered it onto a 3.75″ x 5.5″ piece of Lost Lagoon card stock and a Calypso Coral card base.  I used the Wanted To Say die set to cut out the sediment in Pretty Peacock card stock.  Quick and Easy!

Product List


Abundant Beauty Sneak Peek

Stampin Up Abundant Beauty Decorative Mask

Here is a sneak peek from the upcoming 2023 Stampin’ Up!®  Holiday Catalog.  The catalog ordering period will be available beginning September 6th.  There are an amazing amount of products in it – something for everyone.

To make this card I used a group of Decorative Masks (also called stencils) called Abundant Beauty.  There are seven masks in all, four of which can be used to make this card.  They are called layering masks where it takes more than one to make an image.  In this case, one mask is for the flower petals, two are for the inside of the flowers and another is for the leaves.  Then there are three other masks in the package including houndstooth, leaves and snowflakes.

First, I used the flower petal mask.  I used Blending Brushes to add Crushed Curry in the center of the flowers and Daffodil Delight on the edges.  Then I took two other masks to add for the center of the flowers.  I used Pecan Pie and Early Espresso.  The fourth mask is for the leaves.  There are three different leaves on one mask so I added them a few times using Old Olive ink.

Lastly, I added the sentiment from the die set called Wanted To Say.  I cut it out using Early Espresso card stock.

I can’t give you the link to order the item because it is not live yet but below are the other products that are available now.


Product List

;

Around The Bend

Stampin Up Wanted To Say

I have been anxiously waiting for my copy of the 2023 Stampin’ Up!®  Holiday Catalog.  If you are a Demonstrator you can see it online now but Stampin’ Up!®  also mails us a copy.  I love the products online but I know I love them even more when I have that catalog in my hands.  Demonstrators could place an order from the catalog on August 2nd and customers can order on September  6th.  I did place an order (of course) so I may be doing some sneak peeks soon.

The colors I used on this card are Berry Burst, Fresh Freesia, Lemon Lime Twist and Lemon Lolly.  Can you guess where I came up with these colors?  Yes, it was the Bright & Beautiful Designer Series Paper.  Stampin’ Up!®  makes color combinations so easy to figure out.  You just need to look at their DSP for lots of ideas.

To make this card I first layered a piece of Lemon Lolly cardstock that I had cut out using the Postage Dies from Essentials By Ellen onto a Lemon Lime Twist card base.  Next, I adhered a 3 5/8″ x 4 7/8″ piece of Lemon Lime Twist on top.  I embossed a 3″ x 3.5″ piece of Basic White card stock using one of the Basics 3D embossing folders.  There are three folders in this set and they are part of the Online Exclusives Products.  I cut a 3.5″ x 3.25″ piece of Bright and Beautiful Designer Series Paper and then cute the top at a diagonal.  I added a small strip of Lemon Lolly card stock along the edge.

Next, I cut out the leaves and flowers using the Around The Bend die set and adhered them using Multipurpose Glue.  I cut out the word “Celebrate” from the die set called Wanted To Say in Lemon Lolly card stock and the background in Lemon Lime Twist.

Product List

;

Gorgeous Garden

On Wednesday I showed you some of the cards we made when some of my friends and I got together to stamp.  I wanted to show you the rest of the cards we made.

These are the cards I designed for the others to make.  I let them pick which design they wanted to do.

Stampin Up Gorgeous Garden

Stampin Up Gorgeous Garden

Both cards use a new die set called Gorgeous Garden.  Stampin’ Up!®  named it perfectly because the dies are gorgeous!  There are two of them in the set.  One has the leaves and the other the flowers.  I cut both of them in my Cut & Emboss machine with Basic White card stock.

I took an A2 Basic White card base and layered a 4.25″ x 5.5″ piece of Bright and Beautiful Designer Series Paper on top for the green card and another using Fresh As A Daisy Designer Series Paper for the blue card.  Then I adhered the Gorgeous Garden die cuts on top using Multipurpose Glue.

Next, I cut a piece of Pretty Peacock and Boho Blue card stock using the Countryside Corners dies.  Then I embossed both pieces using one of the Basics 3D embossing folders.  I cut out the words and backgrounds using Pretty Peacock and Lost Lagoon and Boho Blue and Night of Navy card stock.  The ribbon I used was Bordered Ribbon in Lost Lagoon and Textured Ribbon in Boho Blue.

Let me know in the comments which one you like the best.

Here are the cards my friends designed for each of us to make:

This is Debby’s card.  She used one of my favorite sunflower stamps.  It is a two-step stamp (meaning it takes two or more stamps to make an image) that is just beautiful.

Laura also used sunflowers for her card.  I love how she had us stamp the sunflower in each corner.  Then, we cut out the center using one of the Stitched Rectangle Dies and backed it with a piece of Early Espresso card stock.

Stampin Up Celebrate Sunflowers

Char made a fun fold card that is just too cute.  I love that the front opens.  I know I will making this one again!

This is what it looks like when open.  Isn’t that cute!

Stampin up Countryside Corners

Thanks, ladies.  I am looking forward to the next time we meet!

Product List

;

Sketched Plaid

Stampin Up Sketched Plaid, Stampin Up Wanted To Say

I hope everyone had a wonderful 4th of July.  The weather here in Northern New York was perfect.  We did lots of boating, jet skiing, swimming and eating.  All the neighbors were here to celebrate.  It was so much fun.  Now, back to reality!

I have been trying to use some Stampin’ Up!®  products that are new and have not seen much ink.  There is a new background stamp called Sketched Plaid which is great for making masculine cards. I first stamped it using Blueberry Bushel ink onto a 4.25″ x 5.5″ piece of Balmy Blue card stock.  Then I cleaned off the stamp and inked it with White pigment ink.  I moved the stamp over so that the white ink lines would be between the Blueberry ink. lines.  Pigment ink takes a bit to dry so I heat it with my Heat Tool to speed up the process.  Then, I cut it down to 4.75″ x 3.5″ and layered it on top of a 5″ x 3.75″ piece of Blueberry Bushel card stock and a Balmy Blue card base.

Next I used the die set called Wanted to Say and cut out the sentiment in Blueberry Bushel card stock and the background die in Basic White.  I had a leftover Lemon Lime Twist leaf that I didn’t use on another card I made using the Paper Florist Dies.  Lastly, I add some Tinsel Gems.  Tinsel Gems come in two different packages.  One is a three pack and one is a four pack. I used a color in the four pack for this card.

Product List


Wanted To Say & A Fun Technique

Stampin Up Wanted To Say

My friend, Jackie, shared a video with me a couple of weeks ago where another stamper (Jo Simons) did a fun technique using an embossing folder.  I liked it so much I wanted to try it out.  It is super easy and I love the way it turns out.

First I took a 4.25″ x 5.5″ piece of Basic White card stock and added a lot of colors to it using a Blending Brush or a sponge. I used Parakeet Party, Old Olive and Mossy Meadow inks.  I just randomly spread those colors around until I was happy with the results.  You don’t need to be perfect at.  It is ok to have brush marks.  When I was done, it looked like this:

Next, I squished ( a very technical term) a Pebbled Path ink pad onto the side of my Fern 3D embossing folder where the image is debossed.  In the case of this folder, it is on the side where the Stampin’ Up!®  logo is.  You can use a brayer if you want but it worked fine by my squishing method.  You can also use any dark color you prefer.  I added the piece of card stock I made with the ink and ran it through my Cut & Emboss Machine.  The dark ink gets only on the background of the card stock and makes the blended colors pop.

To finish this card, I cut the embossed piece of card stock to 5″ x 3.75″ and layered it on a 5.25″ x 4″ piece of Parakeet Party card stock and onto a Basic White card base.  I cut a piece of Mossy Meadow card stock using the Countryside Corners dies and adhered that to my card front using Dimensionals.  Next, I used the die set called Wanted To Say and cut out the words using Parakeet Party and the background using Basic White card stock.

Product List


Sweet Citrus

Stampin Up Sweet Citrus

Today’s is one of my best friend’s birthday.  Char and I have been friends for 35+ years.  We actually met because my third and and youngest son had a lot of issues when he was first born so I decided to stay home with him and his brothers.  In order to make ends meet I started a daycare.  Char contacted me and brought her children over and things just blossomed in a life long friendship.  Char is the sweetest, most kind person and I love her dearly.  Plus, she is a downline of mine, which makes it that much better.  This is the card I made for her birthday.  I love how bright the colors are and thought she would love it too.

To make this card, I first used the background stamp called Sketched Plaid.  I stamped it with a new color called Azure Afternoon onto a 4″ x 5.25″ piece of Basic White card stock.  I adhered that to an Azure Afternoon card base.  Azure Afternoon is a beautiful bright blue.  It is darker than Tahitian Tide but lighter than the retired Pacific Point.  I can see using it a lot in my future.

Next, I used the stamp set called Sweet Citrus.  This stamp set is a two-step stamp set which means it can take two or more stamps to make one image.  The first stamp was the outlines of the fruit and the second stamp was the insides.  I actually stamped both images twice – once in Daffodil Delight ink and once in Lemon Lime Twist.  Sweet Citrus has a coordinating die set as well as an embossing folder.  The large die cuts out all the fruit at once.  Then I stamped the leaves in Azure Afternoon ink and cut them out using the die set.  I arranged all the pieces on top of the card.

Lastly, I used the stand alone die set called Wanted To Say.  This is a fun die set that cuts out various words such as “Happy Birthday”, “Celebrate”, “you’re too kind” and “Feel Better Soon”.  Then it has another die that cuts out a background for each of those phrases.  Also included are some miscellaneous dies such as stars, hearts, a flower, a bow and stems.  I cut out the word “Celebrate” in Azure Afternoon and the background in Basic White.  I layered that on top using Dimensionals.

Happy birthday, Char.  I hope you have an amazing day!


Product List