Simply Zinnia & New InColors

Stampin Up Simply Zinnia

Hello everyone!  I am sorry I haven’t posted in a while but Rob has been traveling for business a lot lately and I decided I wanted to go with him so I went to Orlando for a few days.  It was nice to get away.  The weather wasn’t the greatest but it was nice to have a change of scenery.  By the way, if you are ever in Orlando you have to go to an Italian restaurant called Christini’s.  It is the best Italian restaurant I have ever been to.  Their attention to detail is amazing.  They had an accordion player, flowers in their drinks and the place looked awesome.  It was such fun!

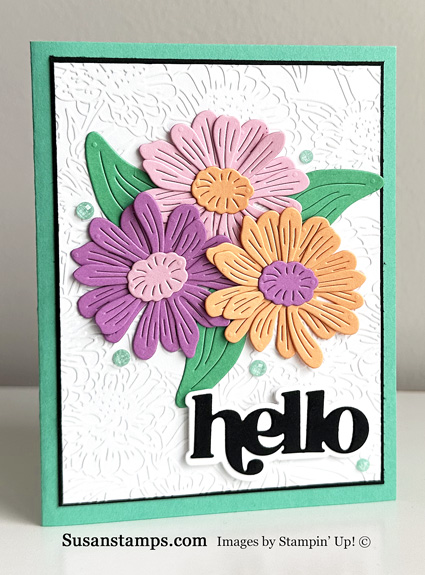
I have been wanting to play with the new 2024-2026 InColors.  I love them because they are bright and fun.  I wrote a post about them a couple of weeks ago but I hadn’t made anything using them.  I thought the Simply Zinnia Suite would be perfect to show them off.  This suite is an Online Exclusive (which means they are not in any catalog)  includes a stamp set, coordinating dies, an embossing folder and Designer Series Paper.

I first cut out all the flowers and the centers in the Simply Zinnia die set using Pretty In Pink, Peach Pie and Petunia Pop. I cut the leaves out in Shy Shamrock.  Next, I embossed a piece of Basic White card stock with the Simply Zinnia embossing folder and adhered it to a piece of Basic Black card stock.  Then I layered them onto a Summer Splash card base.  I added some of the new 2024-2026 InColor Shimmer Dots which will be available for purchase on May 1st.

The sentiment is a die set from Altenew called Timeless Sentiments.  I adhered it to the card using Dimensionals.

Product List


Cheerful Daisies

Stampin Up Cheerful Daisies

My favorite weather is when it is sunny and in the 70’s.  The best part of having two homes, one in Northern New York and one in Nashville, is I get to enjoy summer for a much longer time.  When we leave Tennessee in the spring it is in the 70’s here.  The temperature usually starts to warm up at the end of March or beginning of April so we get a couple months of my perfect weather.  Then we go to the cottage and it is cooler but usually reaches the 70’s in June and starts to get cooler in mid-september.  Then we come back to Tennessee and it is still in the 70’s!  I love it!

I made this card using the Stampin’ Up!® Cheerful Daisies Bundle.  One die cuts out three daisies and two leaves.  I cut one out in Lemon Lolly and another in Fresh Freesia.  Then I cut out the leave twice in Lemon Lime Twist card stock and glued them over the yellow and purple leaves.  I cut out the centers of the flowers in Pecan Pie.  The background is an Altenew die called Grid Cover.  I cut that out of Basic White card stock three times and glued each layer together to give the card more depth.  I decided to wait until I am ready to send the card to add a sentiment.

Product List

Framed Florets

Add just the right touch of elegance to any occasion, including Christmas and seasonal celebrations, with the sweet Fitting Florets Collection. From color schemes to sentiments and embellishments to dies, these unique products blend together so that your cards and crafts fit whatever occasion you might need. Send birthday wishes, express your gratitude, or spread Christmas cheer—with so many options to mix and match you’ll be set no matter the celebration all year!  This collection will be available to customers beginning tomorrow, November 1st.  The collection includes two stamp sets, coordinating dies, Designer Series Paper and embellishments.  The Framed Florets stamp set and dies will be available in the  2023 January – June Mini Catalog but the Framed & Festive stamp set, the Designer Series Paper and the embellishments will only be as supplies last.

A couple of the things I love about his collection is the dies include three different oval shapes and one of the dies cuts out some of the flowers in the Designer Series Paper.  The Designer Series Paper is gorgeous with beautiful colors.  You can see a card I made using these products HERE.

Here is a video showing you the different products.

Here are the details:


Cup Of Tea

Stampin Up Cup Of Tea

I have to confess.  I hate coffee.  I hate the smell of coffee.  I have never had a cup of coffee in my life.  I know.  Most people think I am crazy (right Buffy?).  I think it is because neither of my parents ever drank coffee so I did not grow up with it.  I have two sisters who don’t drink it either.  Years ago, when I worked as the finance officer in a golf club, I offered to make coffee for the servers because it was so busy.  It didn’t seem too hard to do since the coffee was premeasured so all you needed to do was open the pack, pour it in the coffee filter and turn on the machine. I did all that and then went back to my office.  Later that day, the servers told me I was never allowed to make coffee again.  Apparently, you also need to put the glass pot underneath.  Oops.  All the coffee when all over the floor.  They were not too happy with me that day!  As a side note, I am a one-cup-a-day hot tea drinker.  It is just enough caffeine to get me through the day.

I love the Cup Of Tea bundle that is in the 2022/2023 Stampin’ Up!® Annual Catalog.  This bundle, which you can save 10% if you purchase using the bundle item number, includes the stamp set called Cup Of Tea and a die set called Teacup.  I knew I would order it the day I first saw it.

To make this card I first adhered a 4″ x 5.25″ piece of Design A Daydream Designer Series Paper onto a Petal Pink card base.  You can purchase this amazing pack of paper with a $150 order.  It includes 48 sheets of DSP in the pack!  Then I cut out a piece of Petal Pink card stock using the Scalloped Contours die set.  I cut three cups out of Basic White card stock and three of the design for the cups in Fresh Freesia card stock.  I stamped the lemons in Daffodil Delight and cut them out using the coordinating dies.  The sentiment is from the stamp set called Sending Smiles and was cut out using the Sending Dies.


Product List

Framed Florets

Stampin Up Framed Florets

This is a sneak peek of a new collection that will be available for customers to order on November 1st.  It is called Framed Florets and includes two stamp sets called Framed Florets & Framed & Festive, Framed Florets dies, Fitting Florets Designer Series Paper and Gold Adhesive-Backed Swirls embellishments.  The Framed Florets stamp set and coordinating dies will be in the 2023 January – June Mini Catalog but the Framed & Festive stamp set, Designer Series Paper and embellishments are only while supplies last.

To make this card I first adhered a 3.75″ x 5.25″ piece of the Fitting Florets Designer Series Paper to a Blushing Bride card base.  Next, I used one of the oval dies (there are three in the set!) to cut the frame in Blushing Bride card stock and the center in Basic White and glued them to the center of the card.  I stamped the sentiment from the Framed Florets stamp set in Evening Evergreen ink.  One of the things I love about this collection is one of the dies cuts out some of the flowers in the Designer Series Paper which I used on this card.

Overall, this was a very quick and easy card to make.  The hardest part was picking out which sheet of DSP I wanted to use.  Each sheet is just gorgeous!

Here is a video where you can see the products.

Celebrate With Tags

Stampin Up Celebrate With Tags

Hello everyone.  It has been a very busy couple of months around here.  We have traveled a lot visiting our family but I think we are now home for a few weeks.  I guess now, there is no more putting off some chores that need to be done and maybe even finding some time to do some more crafting.  I did have a chance in between trips to organize my stamp room a bit.  I discovered I had three huge boxes of retired Designer Series Paper and card stock that I had stored away to use “sometime”.  Well, some of that paper is 8 -10 years old so I decided it was time to do something with it.  I called my granddaughter, Madelyn’s school and they were happy to take it.  I am glad it will go to good use.  Now I have some more room to get things organized!

I decided it was definitely time to start thinking about Christmas and making Christmas cards so I have been playing around a bit trying different stamp sets and designs.  I love the bundle in the June – July Mini Catalog called Celebrate With Tags so I decided to take it out and play a bit.  This bundle includes the stamp set called Celebrate With Tags and the Celebration Tags die set (you can save 10% by purchasing them in a bundle).  You can make these great tags for all your Christmas gifts easily, which is why I bought the bundle in the first place.  I love making my own tags but it is also great for making Christmas cards too.

To make this card I first cut out the tag and the snowflakes using the Celebration Tags die set in Shimmery White card stock.  I love how this card stock has a bit of sparkle to it  (perfect for snowy Christmas cards).  Then I embossed the tag using the Wintry 3D embossing folder.  I added a piece of Metallic Woven Ribbon in Starry Sky to the tag.   I adhered the tag and snowflakes to a piece of Design A Daydream Designer Series Paper.  I layered that on a piece of Basic White card stock and a Starry Sky card base.  Next, I stamped the mittens with Starry Sky ink and cut them out using the coordinating die.  I stamped the sentiment in Shaded Spruce and cut that out using the banner die.

Product List

Embossing With Masks


Stampin Up Soft Seedlings

The internet is a fantastic place to find many new stamping ideas.  I was looking around to see if I could find a new technique and I ran across this one.  It is where you use a Mask to emboss a piece of card stock.  There were tons of samples so I can’t give credit to whoever came up with the idea in the first place but it was a brilliant and easy one!

When cut and emboss machines came out a long time ago many of them included an embossing pad.  I know you can still get them online but I am not sure the machines come with them anymore but I had an old one I used with my Cut & Emboss Machine.   The sandwich you need is as follows:  The large cutting platform (plate #1), the shim plate (#2), a cutting plate (#3), the rubber mat, cardstock (I used Basic White), the Mask (I used one from Artistic Mix), and another cutting plate (#2).  Some machines may need an additional shim such as a piece of card stock but mine worked fine without one.  Below is a close-up of how it turned out.

Stampin Up Embossing With Masks

Isn’t that fun?

To make the rest of the card, I used the stamp set called Soft Seedlings using the Stamparatus.  That way you can keep the card stock in place and stamp it multiple times.  I first stamped it using Crushed Curry ink.  Then I cleaned off the stamp and did it again using Pumpkin Pie and then Real Red ink.  Then I cut it out and layered it on the piece I had embossed and then on a piece of Pumpkin Pie card stock.  Next, I stamped the sentiment and layered that onto a piece of Pumpkin Pie card stock.

I thought it was such a fun idea and I love how it came out.  You should try it!

Product List

Mini Pocket Envelope Dies

Stampin Up Mini Pocket Envelope

Last Friday was my grandson, Nolan’s fifth birthday.  As a birthday surprise, his parents took him and his sister, Madelyn to Disney World.  Rob and I decided to give each of them a Disney gift card to spend while they are there.  I didn’t have a lot of time but I wanted to put the gift cards in something other than to just hand them to the kids so I made these two gift card holders for them.

The gift card holders were very easy to make using the Mini Pocket Envelope Dies.  One die cuts out the entire envelope.  All you need to do is glue one side and the bottom together.  It is as easy as pie!  I cut the first one out of Starry Sky card stock (Nolan’s favorite color) and the other one out of 2022-2024 InColor Glimmer Paper for Madelyn in Tahitian Tide (her favorite color).  I made Mickey and Mini Mouse using retired punches in Basic Black card stock.  I hand-cut the bow tie out and used a retired die to cut out the hair bow.  Then I just had to add googly eyes because all kids love googly eyes!  The “For You” is also a die from a retired set.

The nice thing about the Mini Pocket Envelope dies is you can give them alone or you can put them in a card.  Both of them took me about ten minutes to make.  Actually, it only took that long because I. had to search for the “For You” dies.

Product List

Beauty Of Friendship

Stampin Up Beauty Of Friendship

Beauty Of Friendship is a stamp set that has been around for a while now.  It is a beautiful set that has gorgeous trees and some great all-around sentiments.  It used to have coordinating dies but Stampin’ Up!® retired them for some unknown reason.  It is ok though.  You don’t have to have the dies to make beautiful cards using this stamp set.

To make this card I first stamped the trunk of the tree in Basic Gray Ink and the leaves of the tree in Old Olive.  One thing I love about this set is some of the stamps are DisINKtive stamps.  This means that one stamp creates different opacities which brings depth to the image.  If you look at the leaves of this tree you can see where some leaves are darker than others.  This was created by one stamp.

After I stamped the tree, I cut it out using the Deckled Rectangles dies and I backed it up with a piece of Old Olive card stock.  Then I cut a piece of the Designer Series Paper called Sun Prints also using the Deckled Rectangles.  This DSP is beautiful can is very delicate looking.  I backed that up with another piece of Old Olive card stock.  I adhered all the layers onto a Gray Granite card base.  Lastly, I stamped the sentiment in Old Olive ink and cut it out using a retired banner die.

Product List


Cottage Wreaths

Stampin Up Cottage Wreath

It has been a couple of busy weeks for us and will probably continue for a while.  As you know, we left the cottage and we are now in Nashville.  Then Rob left for a week for a conference in Austin.  I spent the week putting our belongings away and setting up my stamp room.   Last weekend was my grandson’s (Jackson’s) second birthday.  My son and his family live in Montgomery, Alabama so we went there to celebrate. This week my other grandson, Nolan, has no school so he has been spending his time with me (which has been a lot of fun).  Then this coming weekend is Nolan’s fifth birthday.  I did manage to make a couple of cards in between all of that.

I made this card using the stamp set called Cottage Wreaths.  This stamp set is in the July – December Mini Catalog and there is a set of coordinating dies called Country Wreaths.  If you use the bundle item number when ordering you can save 10%.  I first stamped the wreath in Evening Evergreen Ink and cut it out using the coordinating die.  Then I used the Dots & Spots die to cut out the berries and the bow in Real Red card stock.  I used the Split Textures dies set to cut out a 3.75″ x 5″ piece of Basic White card stock.  This is one of my favorite background dies because it adds so much interest to your card.  I layered everything on top of a 4″ x 5.25″ piece of Soft Succulent card stock and an Evening Evergreen card base.  Lastly, I stamped the sentiment in Real Red ink.

Product List